3D PRINTING: STILL A GAME-CHANGER FOR MEDICAL EDUCATION
Medical education has always relied on physical models to teach anatomy, but traditional options, such as cadavers or expensive commercial models, come with limitations. Enter 3D printing, a technology that has begun helping educators explore new approaches to anatomy education by making it more accessible, customisable, and interactive.
One of the most exciting aspects of 3D printing is its ability to democratise resources. Today, there are hundreds of free anatomical models available online, ranging from bones and organs to complex vascular structures. Some platforms like NIH 3D Print Exchange and Thingiverse (UltiMaker, Utrecht, Netherlands) host open-source and free designs that educators and students can download and print at minimal cost. This accessibility means that even institutions with limited budgets can provide hands-on learning experiences. The days when the professor had to go retrieve decades-old specimens from the storage room are long over. Those memories remain with me, along with a clear awareness of the many things that could have been done or taught differently. In anatomy education, especially, most learners benefit greatly from having a tangible, 3D object to observe, or, even better, to touch, hold, and inspect from every angle. That moment has arrived. The event horizon has been crossed, and the inescapable pull of the technological universe now shapes many aspects of daily life. As a result, there is significant potential for the integration of 3D printing into medical education.
One of the biggest strengths is customisation and innovation. Unlike static commercial models, 3D printing allows educators to tailor models to specific learning objectives. For example, printing a heart that can be split in long and short axes to visualise the chambers, or a skull with detachable sections, can help students understand spatial relationships in ways that textbooks cannot. This is great; however, there are many complex systems, such as the nervous system, or parts that move in ways that are hard to understand, such as the eyeball in the orbit.
This is where there is an opportunity to take the next step. From personal experience, I have been ‘levelling up’ my models with interactive features. By integrating light-emitting diode (LED) lights to highlight anatomical landmarks and adding movable parts to simulate physiological functions, these models become dynamic teaching tools. Imagine a brain or spinal cord model where different tracts and nuclei light up during a discussion of neural pathways, or a joint model that demonstrates the range of motion. These enhancements may help better interconnect theory and practice, making learning more engaging and memorable.
The future of medical education will likely blend physical and digital interactivity; think augmented reality overlays combined with tactile 3D-printed models. But even now, with the resources freely available and the creativity educators bring to the table, 3D printing is already reshaping how we teach and learn anatomy.
Even if you don’t consider yourself an engineer who missed their true calling, it doesn’t mean you need to be an expert to create powerful, instructive teaching tools in a DIY manner.
PERSONAL, REAL-WORLD EXAMPLES
Many, if not all teachers have subjects or specific problems that pose a certain challenge when taught. For me, having taught head and neck anatomy for more than a decade, two things stood out especially.
The Orbit and Extraocular Muscles
Year after year, an eager crowd of optometry students perk up when we finally get to the orbit, as a topic they will really need in their future careers. And, although often this content has already been taught, many still haven’t ‘gotten it’ yet when it comes to how/why the extraocular muscles pull the eyeball into whichever direction. There are great videos out there, but nothing beats having a model that has moving parts to simulate the movement of the eyeball in the orbit.
The Autonomic Nervous System
Especially the sympathetic part of the autonomic nervous system poses challenges. It’s not intuitive. It’s not very straightforward. But it’s important to understand. We can use diagrams, animations, or descriptions of where the presynaptic and postsynaptic neurons are, respectively, but tangible examples provide 3D visualisation opportunities. Working together with the original creators of the model, and with permission, I printed it in 3D and added LEDs to maximise its utility (Figure 1).
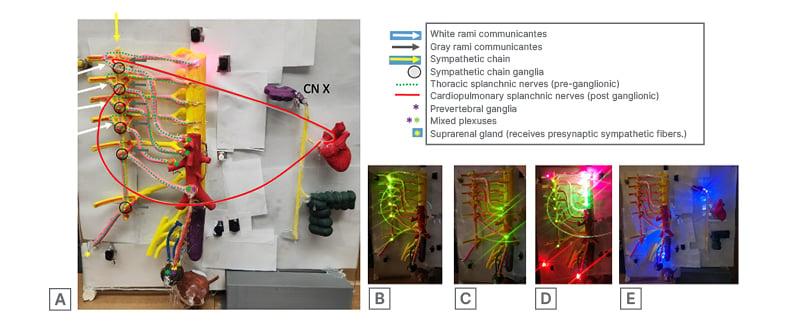
Figure 1: Autonomic nervous system prototype with select sympathetic pathway elements highlighted electronically.
In the panel, the top left image (A) shows the whole model, spinal cord, sympathetic chain with rami communicans, and pre- and paravertebral ganglia. The other images show the locations of para- (B) and prevertebral (C) ganglia and the (approximate) location and course of the presynaptic sympathetic fibres originating from the spinal cord (D). Fibre optic cables were added to highlight the pathways of fibres of thoracic or cardiopulmonary splanchnic nerves, which respectively either bypass the para-vertebral ganglion to synapse in the celiac ganglion located on the aorta, or synapse in the paravertebral chain ganglia to head to the heart and lungs. The final image, highlighted with purple LEDs, demonstrates the locations of the parasympathetic outflow for the region, stemming either from the pelvic splanchnics (S2-S4) or the vagus nerve (CN X). All LEDs can be activated or deactivated using push buttons.
This model is intended for classroom use, preferably in small-group settings, to demonstrate how a sympathetic fibre can be traced from its origin in the lateral horn to its destination. This may occur through several pathways: (1) synapsing in the paravertebral ganglion at the same spinal level; (2) ascending or descending within the sympathetic chain; or (3) continuing as a thoracic splanchnic nerve without synapsing and projecting to a prevertebral ganglion such as the celiac ganglion. A long presynaptic fibre to the suprarenal gland has also been included to simulate the unique innervation of the adrenal gland (D). This feature further provides an opportunity to reinforce concepts related to embryological development, including neural crest cells and chromaffin cells.
Questions you may have probably revolve around things like ‘how do I know how to deal with LEDs and soldering things’ or ‘how do you have time to make this stuff’. To really drive a project forward, sometimes an eager student is willing to take on an idea and a second, and maybe a third person can really help. Some really good collaborations and projects have arisen this way, and some even continue years past graduation. I always tell myself that when I get an idea, if I don’t give it a shot, I will have lost an opportunity at success. As annoying as it is, a failed experiment can still be a valuable lesson.
HOW TO USE FREE 3D ANATOMY MODELS EFFECTIVELY
Accessing free 3D anatomy models is just the first step; using them strategically can maximise their educational impact. Here are some practical tips:
- Choose the Right Repository: Start with trusted sources. Many platforms often provide medically accurate models derived from imaging data.
- Match Models to Learning Objectives: Select models that align with your curriculum. For example:
- Skeletal models for osteology lessons.
- Organ models for physiology or pathology discussions.
- Customise Before Printing: This has a steep learning curve; take your time. Use free computer-aided design tools:
- Scale models for classroom use.
- Add detachable parts for interactive learning.
- Incorporate labels or colour coding for clarity.
- Enhance Interactivity: Consider adding features such as:
- LED lights to highlight anatomical landmarks (remember resistors are good).
- Movable joints or other parts to demonstrate function.
- Magnetic connectors for modular assembly.
- Combine Physical and Digital Learning: Pair printed models with software like Complete Anatomy (3D4Medical, Dublin, Ireland) or QR codes linking to videos. This hybrid approach reinforces spatial understanding and clinical relevance.
- Maintain Quality and Safety: Use durable, non-toxic filaments like polylactic acid or polyethylene terephthalate glycol. This is cheap and prints reliably and quickly. You can even print supports with dissolvable filament.
SUMMARY
In my opinion, as an anatomist, cadaveric anatomy is the ‘gold standard’ in hands-on medical education, but the resources to offer cadaveric training are not available in all academic institutions. Fortunately, 3D printing has emerged as a transformative tool in medical education, offering accessibility, customisation, and interactivity that traditional cadaveric or commercial models cannot match. By democratising anatomical resources, enabling tailored learning objectives, and fostering innovation through interactive features such as LEDs and movable parts, 3D printing may help bridge the gap between theory and practice.
Additionally, it is important to recognise the evolution from cadaver-based teaching to synthetic models and now to 3D-printed simulations. While these advances offer clear benefits in accessibility and customisation, they may reduce certain aspects of fidelity, such as tissue realism and anatomical variability. Ongoing research and hybrid solutions, including augmented reality and haptic feedback, aim to address these gaps and maintain educational rigour. Emerging literature suggests its potential to enhance spatial understanding, surgical training, and interdisciplinary collaboration, indicating it may become an important component of future medical pedagogy.
KEY TAKEAWAYS
- Accessibility: Free repositories like NIH 3D Print Exchange allow institutions with limited budgets to provide hands-on learning experiences.
- Customisation: Educators can design models tailored to specific learning objectives, such as detachable skull sections or split-axis hearts.
- Interactivity: Adding LEDs, movable joints, or magnetic connectors transforms static models into dynamic teaching tools.
- Hybrid learning: Combining 3D-printed models with augmented reality or digital overlays enhances spatial and clinical relevance.
- Collaborative innovation: Projects often thrive when students and faculty co-create, fostering long-term educational impact.
- Practical application: Complex topics like extraocular muscle mechanics or sympathetic nervous system pathways become more intuitive when taught with interactive 3D models.
CONCLUSION
3D printing is reshaping medical education by providing affordable, customisable, and interactive anatomical models that address persistent gaps in spatial understanding and engagement across training levels.1,2 Open-access repositories and patient-derived imaging pipelines further democratise high-fidelity models, extending impact to resource-limited programmes and supporting equity in curriculum design.1,2 Beyond static replicas, interactive enhancements, such as LED-guided pathways and movable components, are intended to support comprehension of complex systems (e.g., extraocular mechanics, autonomic pathways, spinal tracts, etc.) and may help strengthen the connection between theory and clinical application.1,3 Looking ahead, hybrid ecosystems that integrate 3D printing with augmented and virtual reality are poised to amplify learning outcomes and simulation fidelity, accelerating skill acquisition and readiness for practice.1,3 In sum, 3D printing functions not as an add-on but as a catalyst for pedagogical transformation, delivering conceptual clarity and practical competence at scale.1-3